Showing posts with label feathered friends bom. Show all posts

Wednesday, November 30, 2022

Decembers Block - Winter Cardinals

December is here and so is the final block for this year's BOM. The year has flown by! I want to say thank you for following along and sewing along with me. I have enjoyed hearing from you and seeing your progress as we have stitched along together.

The final block features a couple of cardinals in winter. I have filled up the feeders with a fruit and nut blend and I have enjoyed seeing the cardinals show up. They are so beautiful against the white snow. Yes, it has snowed here in Minnesota, it's cold! Hubby has turned down the thermostats here to save on the heating bill. I'm freezing.... so cold.... glad to have my quilts to snuggle under. Sad part is we haven't even gotten to the coldest part of winter.... uggg. 

 So let me show you how I have made this month's block. Go on over to the Website and download the PDF pattern. The links are below towards the end of the posting. Make sure that your email is correct so that the link for the pattern is sent to you. Also, if you don't find it, check your trash or spam folder just in case it ended up in there....

Print up the pattern and gather your fabric for your applique block.


Trace the applique shapes onto the paper side of your fusible web. I use Flexifuse. I then group the shapes using the same color with the fabric.


Group the shapes with the fabric colors. Following the manufacturer directions, I then iron the fusible web onto the backside of my fabric

Cut all of the shapes out. Following the pattern placement sheet, position all the applique shapes on the cream background rectangle. Some of the shapes overlap. Iron everything in place. Your block is now all ready to be appliqued. I used dark brown thread and an applique buttonhole stitch to stitch around everything. 

~ Winter Cardinals ~

If you have been following along, you just need to download the assembly PDF once you are done with this month's block. You should have everything ready to sew together and then just add the border and your quilt top will be complete!
Feathered Friends BOM 2022 Quilt


Announcement!!!!
All of the block directions and the final assembly can be found on the website under the BOM tab. The border blocks and final assembly are all free downloads until January 1st. 

 The finished size of the quilt is 58" x 65" Each month's pattern is a free PDF instant download. If you miss a month, the patterns are available for $2.50 on my website and also in my Etsy shop.  

If you don't have a printer, you can purchase a PRINTED copy of the pattern

 There's also a Facebook Group, please join and post your progress! It's also fun to see everyone else progress too! Make sure to post your blocks so far! 
Post your pictures of your finished quilt top thru January 15th for a chance to win a few giveaways. 
 Make sure to stayed tuned for that!

I hope that you all have a wonderful day and find some time to do some stitching! I've always got a long list of items I'd like to make for the holidays, I'm going to take some time to work on a few more projects. Let's see if Josephine lets me. Her new trick is to jump up on my lap to snuggle, even if I'm sitting at the computer or sewing machine.  

Happy quilting,
Cindy and Josephine


Sashing Blocks - Feathered Friends BOM 2022

Our Feathered Friends quilt has sashing blocks in between each of the bird blocks. The sashing is a pieced sashing to give the quilt a fun scrappy look. I pulled fabrics that match the birds in the quilt. Using similar colors will pull the quilt together. All of my fabric is from Marcus Fabrics, that's what I have in my stash. The quilt block patterns will be available free until the end of the year.

 So let me show you how I have made the sashing blocks. Go on over to the Website and download the PDF pattern. The links are below towards the end of the posting. Make sure that your email is correct so that the link for the pattern is sent to you. Also, if you don't find it, check your trash or spam folder just in case it ended up in there....
Go on over to the website and download the pattern and print it up.

I went thru my Marcus Fabrics stash and found these fabrics for my scrappy sashing.


Cut 2- 2 1/2" x the WOF (width of fabric) from each of the four different fabrics.


Sew the fabric strips lengthwise using a 1/4" seam. Press. The width of the strip should measure 8 1/2".

Then cut 4 1/2" across the width of the strips to form a 4 1/2" x 8 1/2" rectangle. 

Make 16 sashing units total.

From five different fabrics cut 2 - 2 1/2" x wof strips. Sew the five strips together lengthwise to make a five pieced strip. Press. Make 2.

The width of the strips should measure 10 1/2".

Then cut 4 1/2" across the width of the strips to form a 4 1/2" x 10 1/2" pieced rectangle strips. Cut a total of 15 sashing units.


Announcement!!!!
I have released all of the blocks and sashing directions. Check out the website to download the PDF patterns, they will be free until the end of the year. Stay tuned, I will be releasing the finishing directions by December 7th.

It's an adorable quilt when it is done. The finished size of the quilt is 58" x 65" Each month's pattern is a free PDF instant download. If you miss a month, the patterns are available for $2.50 on my website and also in my Etsy shop.  

If you don't have a printer, you can purchase a PRINTED copy of the pattern

 There's also a Facebook Group, please join and post your progress! It's also fun to see everyone else progress too! Make sure to post your blocks so far! 

 There isn't much left to make for this quilt. I hope that you have enjoyed this year's BOM. I have had a lot of fun putting it together for you. I have a fun quilt planned for 2023!

Happy quilting,
Cindy and Josephine


Friday, November 18, 2022

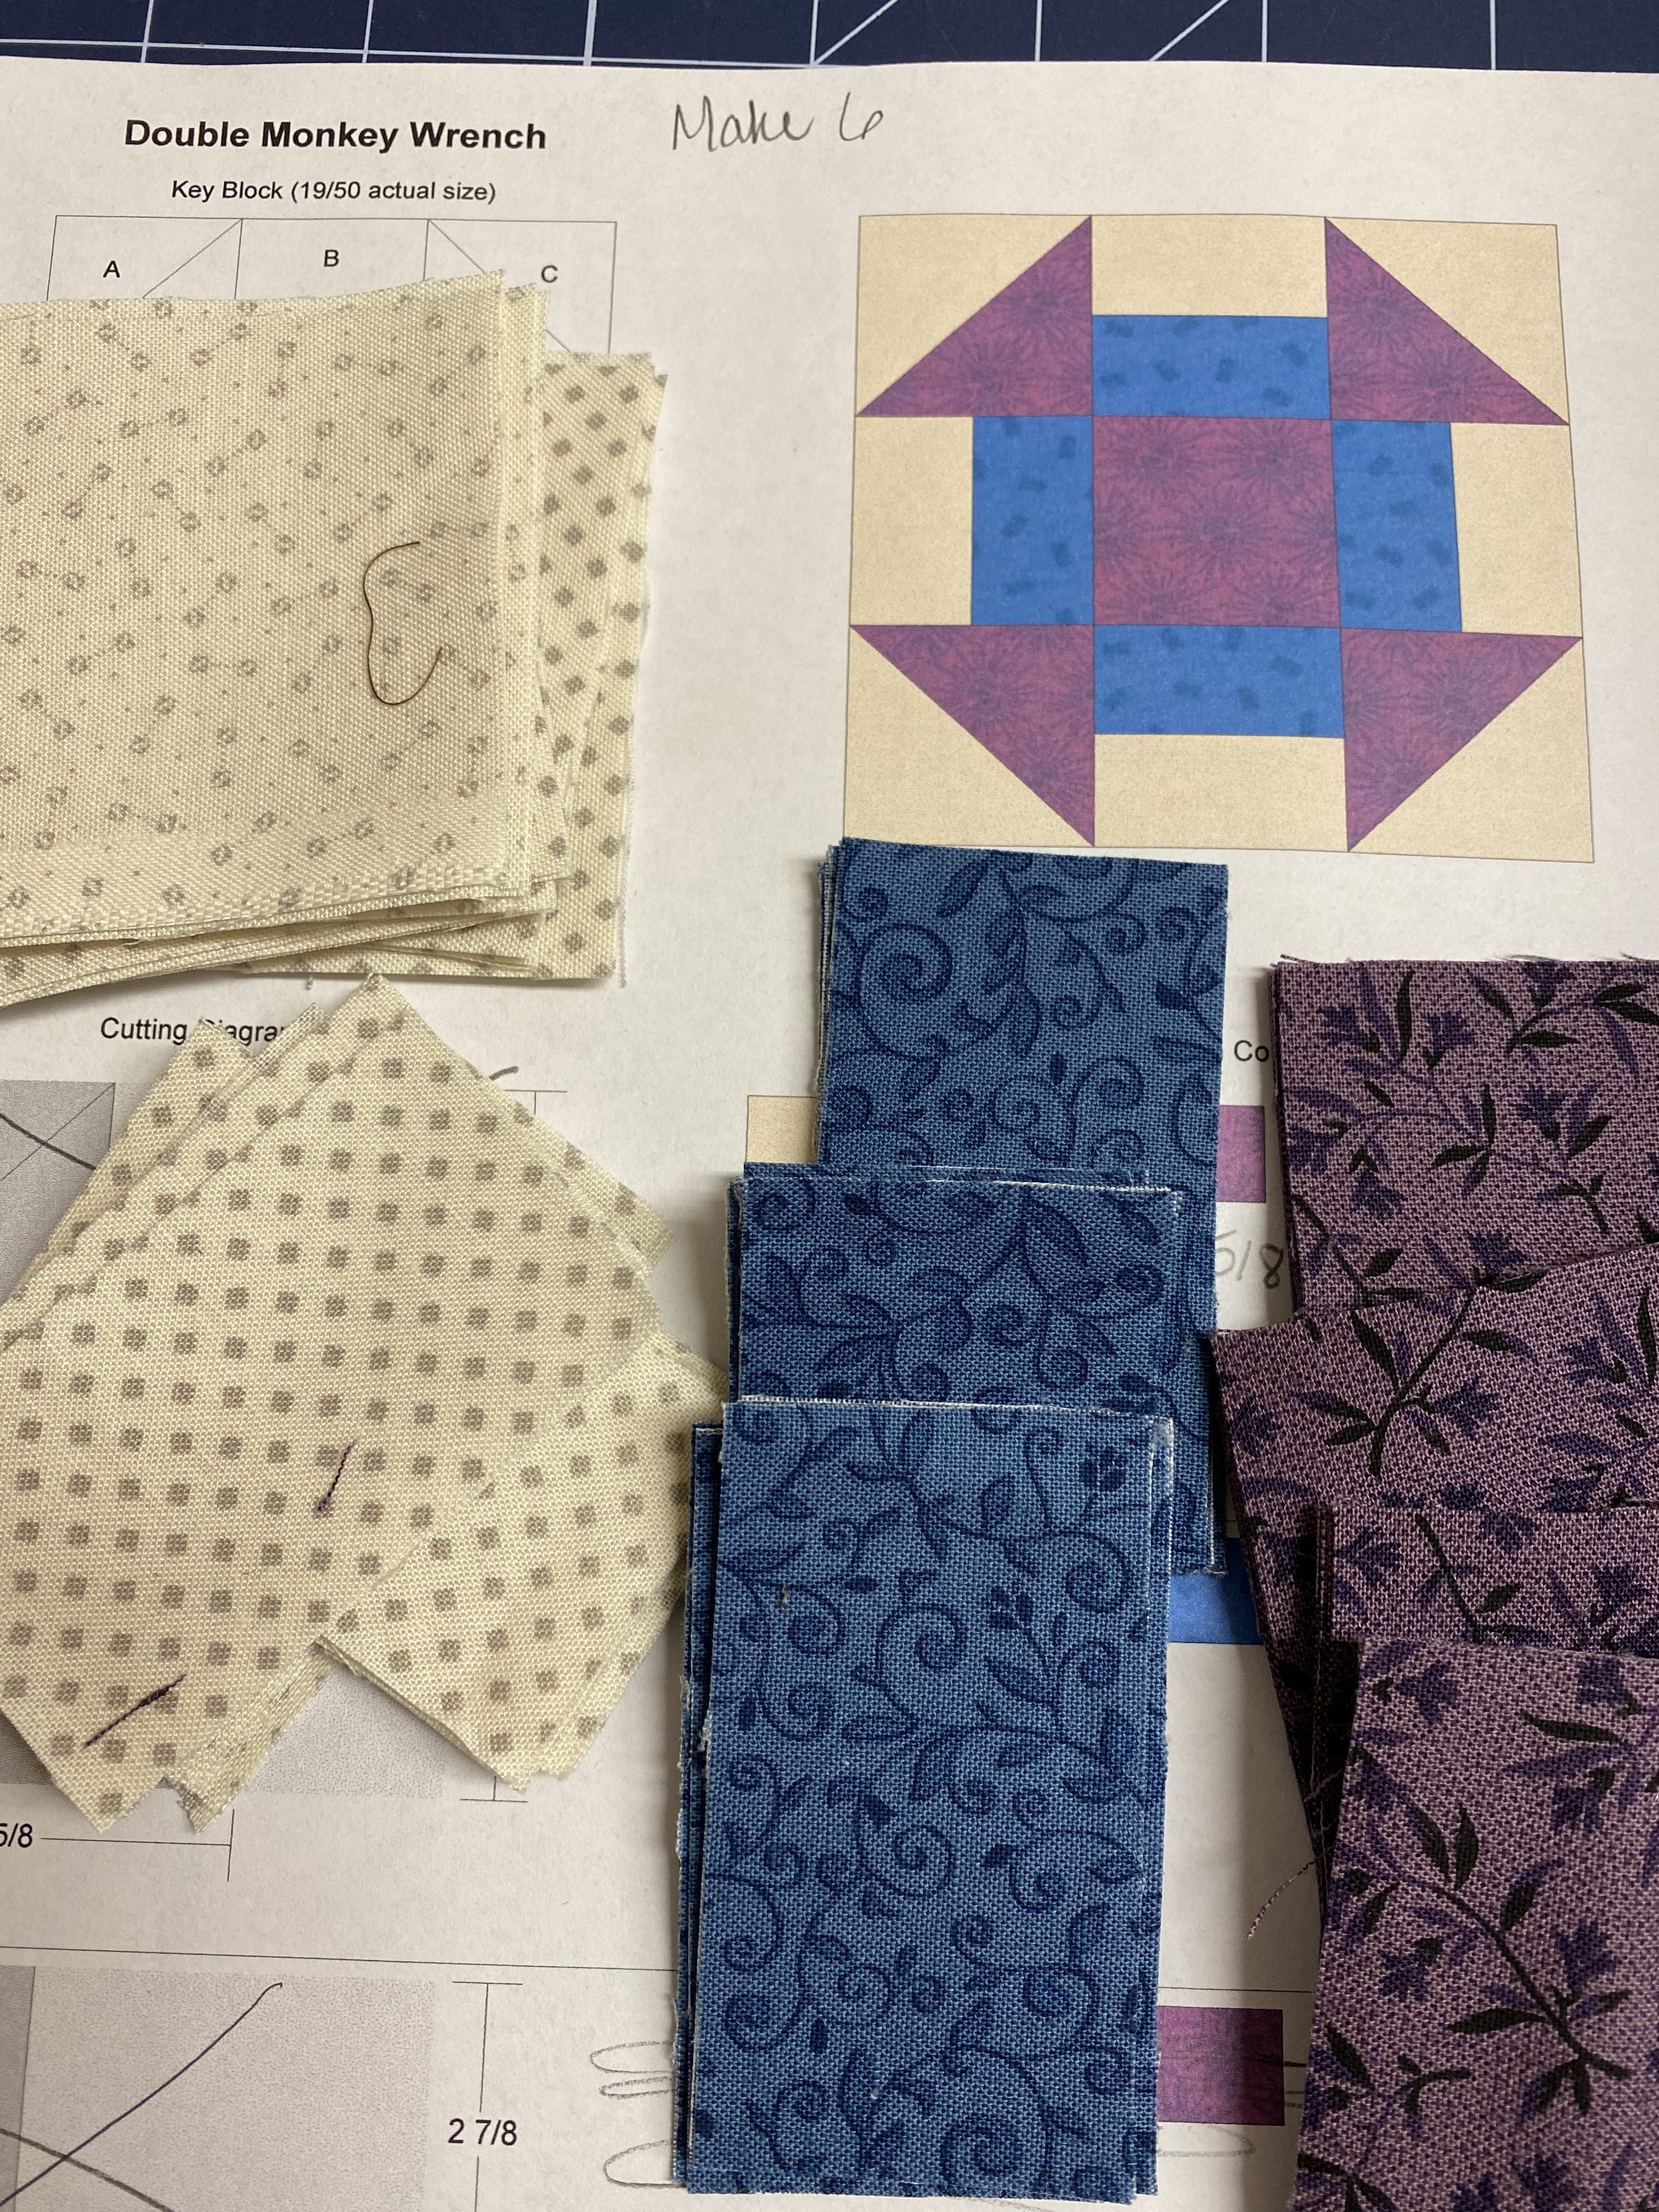
Double Monkey Wrench Block - Feathered Friends BOM 2022

Our Feathered Friends quilt has two rows of blocks to frame the quilt. Today we will make 6 Double Monkey Wrench blocks. This is a fun traditional block. This is the last of the block series for this quilt. I am using a purple and blue and cream fabric for my blocks. If you are making your quilt out of your stash, find fabrics colors that can be found in your applique blocks. This will help to pull your quilt together. For my cream fabrics, I choose a different fabric for each block to make it scrappy.  The quilt block patterns will be available free until the end of the year.

 So let me show you how I have made the Double Monkey Wrench block. Go on over to the Website and download the PDF pattern. The links are below towards the end of the posting. Make sure that your email is correct so that the link for the pattern is sent to you. Also, if you don't find it, check your trash or spam folder just in case it ended up in there....
Gather your fabric and print up your pattern.

From dark fabric cut-

24- 2 5/8” x 2 5/8” squares (A)

6- 2 5/8” x 2 5/8 squares (C)

From coordinating fabric cut- 24- 1 5/8” x 2 5/8” rectangles (B) 

From light fabric cut-

24- 2 5/8” x 2 5/8” squares (A)

24- 1 5/8” x 2 5/8 squares (B)


·         Pair together light A square with dark B square right sides together. Sew corner to corner diagonally. Trim to a ¼” seam on one side to form a triangle square. Press to the dark side.  Make 24 triangle squares total, 4 for each block.


·         Pair together light B rectangle with coordinating B rectangle right sides together. Sew along the long edge using a ¼” seam. Press to the dark side. Trim up to measure 2 5/8” x 2 5/8” squares. Make a total of 24 rectangle squares. Four for each block.


     Following the block layout, stitch the block together using a scant ¼” seam.

I find it helpful to lay the block out next to my sewing machine. Make 6 Monkey Wrench blocks total.
Now this is exciting, go gather your nine patch, friendship star and double monkey wrench blocks. If you have all of the blocks done you can sew together the top and bottom border for the quilt. The order is above.... You will make 2 - 8 block strips for the top and bottom border for the quilt.

Announcement!!!!
I will be releasing the other pieces and parts that you need to complete this quilt throughout this month. Stay tuned! Visit the Quilt Doodle website for the free PDF downloads for the quilt blocks and sashing directions.

It's an adorable quilt when it is done. The finished size of the quilt is 58" x 65" Each month's pattern is a free PDF instant download. If you miss a month, the patterns are available for $2.50 on my website and also in my Etsy shop.  

If you don't have a printer, you can purchase a PRINTED copy of the pattern

 There's also a Facebook Group, please join and post your progress! It's also fun to see everyone else progress too! Make sure to post your blocks so far! 

 There isn't much left to make for this quilt. There is one more bird block that will be available December 1st. I will also release the border and assembly directions at that time too. I hope that you all have a wonderful day and find some time to do some stitching! I'm off to spend some time in my sewing room, I have a stack of Christmas projects.

Happy quilting,
Cindy and Josephine


Friday, November 11, 2022

Friendship Star Block - Feathered Friends BOM

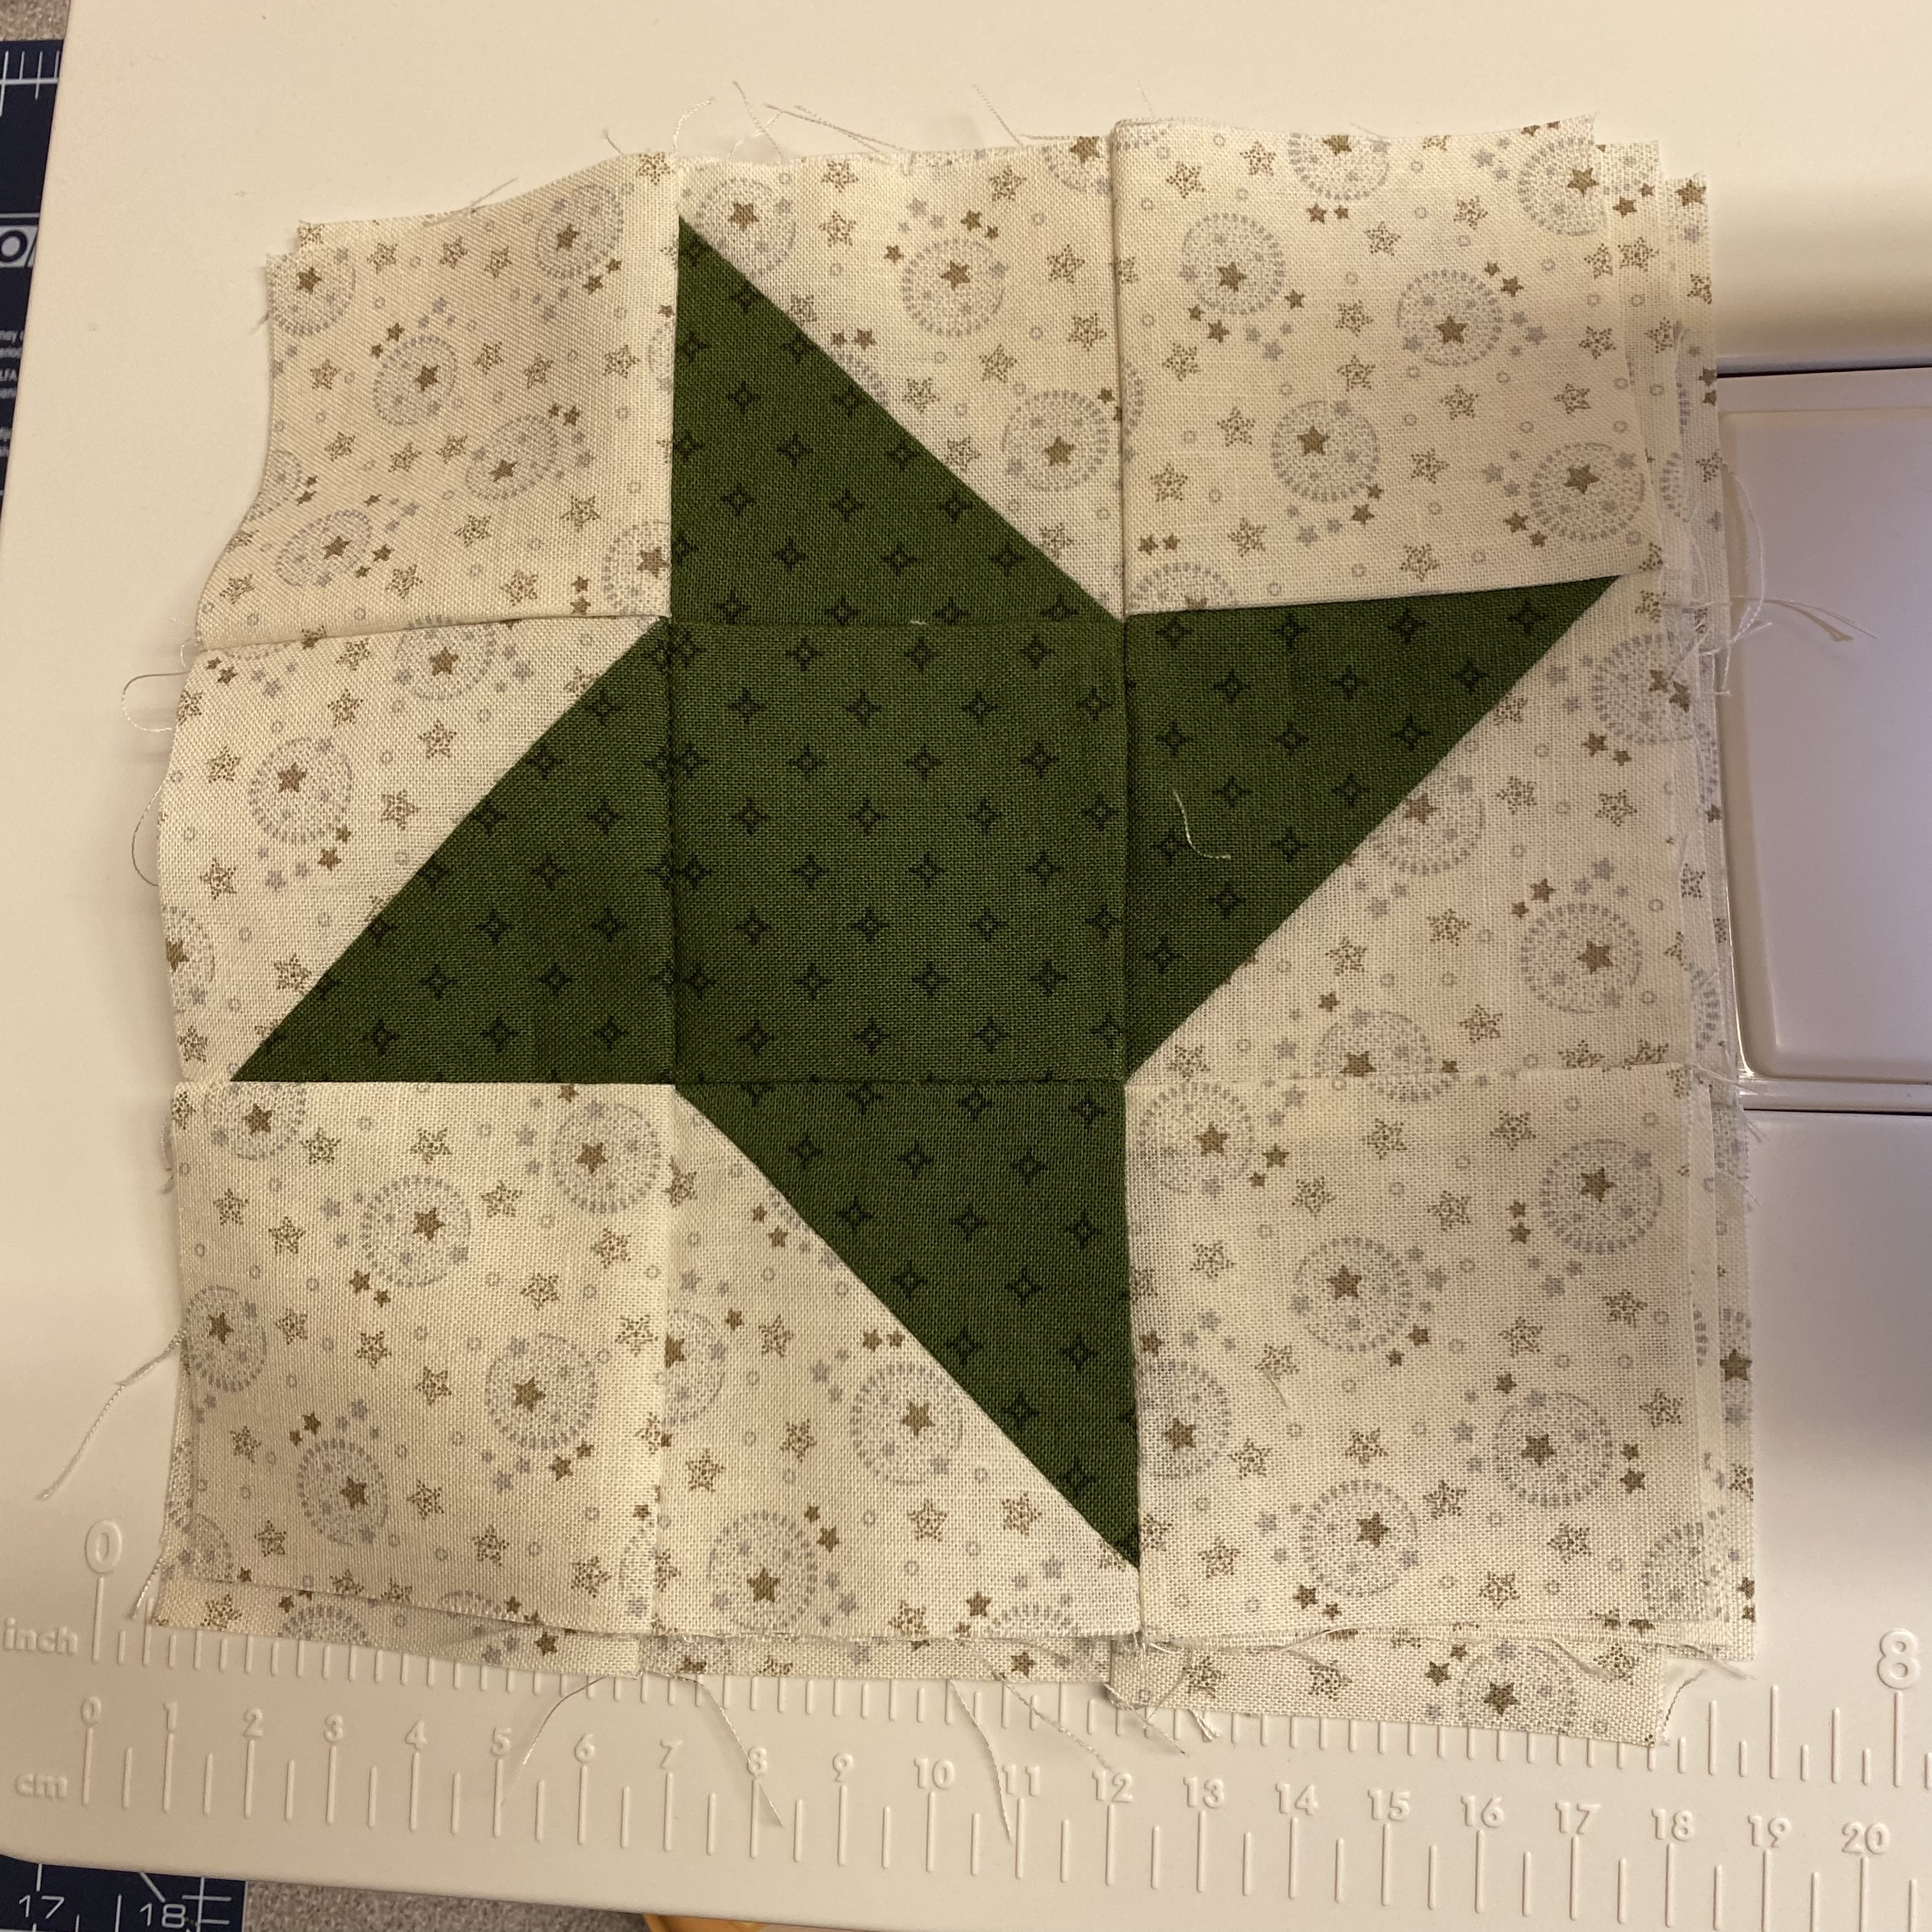
Our Feathered Friends quilt has two rows of blocks to frame the quilt. Today we will make 4 Friendship Star blocks. This is a fun traditional block. I am using a green and cream fabric for my blocks. If you are making your quilt out of your stash, find a 'dark' color that can be found in your applique blocks. This will help to pull your quilt together. I used a dark green in many of my blocks. You will make 4 of these blocks for your quilt. The quilt block patterns will be available free until the end of the year.

 So let me show you how I have made the Friendship Star block. Go on over to the Website and download the PDF pattern. The links are below towards the end of the posting. Make sure that your email is correct so that the link for the pattern is sent to you. Also, if you don't find it, check your trash or spam folder just in case it ended up in there....

Gather your fabric and print up the pattern....

Cut 32 - 2 5/8" squares out of the cream fabric.
Cut 20 - 2 5/8" squares out of the green fabric.

·         Pair together light B square with dark B square right sides together. Sew corner to corner diagonally. Trim to a ¼” seam on one side to form a triangle square. Press to the dark side. Make 16 triangle squares total, 4 for each block.


I find it helpful to lay the block out next to my sewing machine.

Following the pattern sew your Friendship Star block together. Make sure to sew a scant quarter inch seam. Press to the dark side.

Make a total of 4 Friendship Star blocks for your Feathered Friends BOM quilt.

Announcement!!!!
I will be releasing the other pieces and parts that you need to complete this quilt throughout this month. Stay tuned! Visit the Quilt Doodle website for the free PDF downloads for the quilt blocks and sashing directions.

It's an adorable quilt when it is done. The finished size of the quilt is 58" x 65" Each month's pattern is a free PDF instant download. If you miss a month, the patterns are available for $2.50 on my website and also in my Etsy shop.  

If you don't have a printer, you can purchase a PRINTED copy of the pattern

 There's also a Facebook Group, please join and post your progress! It's also fun to see everyone else progress too! Make sure to post your blocks so far! 

I hope that you all have a wonderful day and find some time to do some stitching! I'm off to hang out with my mom and work on some Christmas Projects.

Happy quilting,
Cindy and Josephine


Friday, November 4, 2022

Nine Patch Block - Feathered Friends BOM

Our Feathered Friends quilt has two rows of blocks to frame the quilt. We will begin and make 6 Nine Patch blocks. Super easy and quick to make. I am using a gold and cream fabric for mine. If you are making your quilt out of your stash, find a 'dark' color that can be found in your applique blocks. This will help to pull your quilt together. I used a gold color in many of my blocks. You will make 6 of these blocks for your quilt. The block quilts will be available free until the end of the year.

 So let me show you how I have made the Nine Patch block. Go on over to the Website and download the PDF pattern. The links are below towards the end of the posting. Make sure that your email is correct so that the link for the pattern is sent to you. Also, if you don't find it, check your trash or spam folder just in case it ended up in there....

Gather your fabric and print up the pattern....

Cut 30 - 2 5/8" squares out of the cream fabric.
Cut 24 - 2 5/8" squares out of the gold fabric.

Following the pattern sew your nine patch block together. Make sure to sew a scant quarter inch seam. Press to the dark side.

Make a total of 6 Nine Patch blocks for your Feathered Friends BOM quilt.

Announcement!!!!
I will be releasing the other pieces and parts that you need to complete this quilt throughout this month. Stay tuned! Visit the Quilt Doodle website for the free PDF downloads for the quilt blocks and sashing directions.

Each month will feature an applique design, I have a stash of basic colors that I use for applique, I bet you do too! You will also need a basic cream or white for the applique blocks. You will need 1 3/4 yards of a cream/white background fabric. It can be a tone on tone or neutral print. This cream fabric will also be used for the top and bottom boarders along with some pieced cornerstones. You can also get scrappy with your cream fabrics! The applique blocks will measure 8 1/2" x 10 1/2" (this includes the seam allowance).

It's an adorable quilt when it is done. The finished size of the quilt is 58" x 65" Each month's pattern is a free PDF instant download. If you miss a month, the patterns are available for $2.50 on my website and also in my Etsy shop.  

If you don't have a printer, you can purchase a PRINTED copy of the pattern

 There's also a Facebook Group, please join and post your progress! It's also fun to see everyone else progress too! Make sure to post your blocks so far! 

I hope that you all have a wonderful day and find some time to do some stitching! I'm off to do some Christmas Cookie planning and making a grocery list for Thanksgiving.  

Happy quilting,
Cindy and Josephine


Monday, October 31, 2022

November's Block Minnesota Catbird

November is here and our year is quickly coming to a close! It will be New Year's Eve before we know it! This time of year just flies by with all of the family gatherings for the Holiday Season, I am including Thanksgiving in this list! It just seems like the weekends fill up with gatherings and holiday preparations.

This month's block features a Catbird. I have seen them on my bird feeders and just thought of them as small crows. When listening to their song online, I know I have heard them too. They have a pretty song. I am featuring them with some fall leaves and a birdhouse gourd. My dad grew birdhouse gourds, and my sister shared a box of them at our retreat. I took a few to paint. I like to paint them to look like pumpkins for the fall. I plan on painting a few to look like snowmen, I may also try painting one to look like a gnome. I think that would be super cute! My dad used to varnish them and drill a hole in them for a birdhouse. They are so pretty when they are varnished. I have one that dad made years ago on display in my coatroom. The gourd birdhouse that dad made me is too precious to put outside. I thought it would be fitting to include a gourd in November's design. Dad has inspired this year's quilt. I have his bird watching book and have been selecting birds out of it for this year's quilt. I also want to say thank you to all of you that have been sewing along with me this year! I have enjoyed seeing your progress. Stay tuned I will be announcing the 2023 Block of the Month quilt soon. It's going to be cute!

 So let me show you how I have made this month's block. Go on over to the Website and download the PDF pattern. The links are below towards the end of the posting. Make sure that your email is correct so that the link for the pattern is sent to you. Also, if you don't find it, check your trash or spam folder just in case it ended up in there....

Print up the pattern and gather your fabric for your applique block.

Trace the applique shapes onto the paper side of your fusible web. I use Flexifuse. I then group the shapes using the same color with the fabric.

Group the shapes with the fabric colors. Following the manufacturer directions, I then iron the fusible web onto the backside of my fabric

Cut all of the shapes out. Following the pattern placement sheet, position all the applique shapes on the cream background rectangle. Notice how some of the shapes overlap. Iron everything in place. I used a pencil; you can also use a water soluble or heat pen to mark your embroidery for the branches and gourd vine.

Your block is now all ready to be appliqued. I used dark brown thread and an applique buttonhole stitch to stitch around everything. I used an outline stitch on my machine to stitch the branches. Machine stitching is a big-time saver for me. I also test stitch my buttonhole stitch on a piece of scrap fabric before starting on my applique.

~ Minnesota Catbird ~


Isn't it a fun design? I love it! This would be a cute design on a tea towel too! 

Announcement!!!!
I will be releasing the other pieces and parts that you need to complete this quilt throughout this month. Stay tuned! Visit the Quilt Doodle website for the free PDF downloads for the quilt blocks and sashing directions.

Each month will feature an applique design, I have a stash of basic colors that I use for applique, I bet you do too! You will also need a basic cream or white for the applique blocks. You will need 1 3/4 yards of a cream/white background fabric. It can be a tone on tone or neutral print. This cream fabric will also be used for the top and bottom boarders along with some pieced cornerstones. You can also get scrappy with your cream fabrics! The applique blocks will measure 8 1/2" x 10 1/2" (this includes the seam allowance).

It's an adorable quilt when it is done. The finished size of the quilt is 58" x 65" Each month's pattern is a free PDF instant download. If you miss a month, the patterns are available for $2.50 on my website and also in my Etsy shop.  

If you don't have a printer, you can purchase a PRINTED copy of the pattern

 There's also a Facebook Group, please join and post your progress! It's also fun to see everyone else progress too! Make sure to post your blocks so far! I will be ending this year's BOM with some giveaways. Make sure to stayed tuned for that!

I hope that you all have a wonderful day and find some time to do some stitching! I'm off to my sewing room to quilt a scrappy Christmas quilt that I pieced while on retreat.  

Happy quilting,
Cindy and Josephine

Wednesday, August 31, 2022

Septembers Block and Cornerstones

September has arrived, where did the summer go? Kids will be back to school soon, the state fair is in its last week, true signs that summer is over... our summer was so full of events that it sure flew by! It's hard to believe that we will soon be thinking about getting the fall decorations out. I do have a maple tree that is turning, it always feels like it's too soon, but this maple is always the first tree in our yard to turn. 

This month's block features sunflowers and a set a sparrow, yes, another set of sparrows. There are so many different sparrows in my bird book. These feathered friends have a little different coloring. I also had to feature some sunflowers. My sunflowers are in full bloom right now, they are so pretty. I love how their little flower heads turn towards the sun! I leave my sunflowers in the garden thru winter so that the birds have the seeds to nibble on thru the cold months.

 So let me show you how I have made this month's block. Go on over to the Website and download the PDF pattern. The links are below towards the end of the posting. Make sure that your email is correct so that the link for the pattern is sent to you. Also, if you don't find it, check your trash or spam folder just in case it ended up in there....

Trace the applique shapes onto the paper side of your fusible web. I use Flexifuse. I then group the shapes using the same color with the fabric.

Go thru your fabric and pull the colors that you are going to use for the block.

Group the shapes with the fabric colors. Following the manufacturer directions, I then iron the fusible web onto the backside of my fabric. Then cut all the shapes out...

Cut all of the pieces out.

Following the pattern placement sheet, position all the applique shapes on the cream background rectangle. Notice how some of the shapes overlap. Iron everything in place.

I like to use an open toe foot for applique stitch. It's easier to see needle and stitch placement. I am using a brown thread to buttonhole stitch around the
 design. 


~ Sparrow ~

Today we will also work on making the cornerstones for the quilt top. I used a light and a dark fabric. You will need 1/2 yard dark and 3/4-yard light. The extra will be used in other parts of the quilt. I am using a variety of light-colored fabrics to add up the 3/4 yard in the quilt I am working on. All of my light fabrics are coordinates that I had in my fabric stash from Marcus. The directions for the block can also be found on the website.

The fabric I'm using for my cornerstone blocks.

The finished blocks will measure 4 ½” x 4 ½” square block (including seam allowance)


From dark fabric cut-

40- 2 7/8” x 2 7/8” squares, then cut in half diagonally to form 80 triangles (A).

 From light fabric cut- 20- 3 3/8” x 3 3/8” squares (B).


·         Line up the diagonal edge of a dark triangle A along the edge of the light square B, right sides together. Center the triangle so that the ‘tails’ are even on each side. Sew a ¼” seam along the diagonal edge.

    Repeat on the opposite side of the square B.

     Press to the dark side.


Line up the diagonal edge of a dark triangle A along the edge of the light square B, right sides together. Center the triangle so that the ‘tails are even on each side of the block. Sew a ¼” seam along the diagonal edge.

    Repeat on the opposite side of the square B.

      Press.


     Trim the block up to measure 4 ½” x 4 ½”. Make 20 blocks total and set aside for when we assemble the quilt top. Remember we still have a few more birds to do.

Each month will feature an applique design, I have a stash of basic colors that I use for applique, I bet you do too! You will also need a basic cream or white for the applique blocks. You will need 1 3/4 yards of a cream/white background fabric. It can be a tone on tone or neutral print. This cream fabric will also be used for the top and bottom boarders along with some pieced cornerstones. You can also get scrappy with your cream fabrics! The applique blocks will measure 8 1/2" x 10 1/2" (this includes the seam allowance).

It's an adorable quilt when it is done. The finished size of the quilt is 58" x 65" Each month's pattern is a free PDF instant download. If you miss a month, the patterns are available for $2.50 on my website and also in my Etsy shop.  

If you don't have a printer, you can purchase a PRINTED copy of the pattern

 There's also a Facebook Group, please join and post your progress! It's also fun to see everyone else progress too! Make sure to post your blocks so far! I will be ending this year's BOM with some giveaways. Make sure to stayed tuned for that!
I hope that you all have a wonderful day and find some time to do some stitching! I'm off to my sewing room to do some piecing. 

Happy quilting,
Cindy and Josephine