Showing posts with label Santas Journey BOM 2023. Show all posts

Friday, December 1, 2023

December's Here!


Happy December! It's hard to believe that the end of the year is almost here! There is so much to do this time of year. I haven't gotten my tree or any of the decorating done yet. Hubby did his part; I came home thanksgiving weekend to a beautifully decorated house all lit up with the Christmas lights. He always waits until after thanksgiving to put up the lights. It's such a treat to come home to see the Christmas lights on. I have to say, I did get the front porch decorated with pine boughs and dogwood once the Christmas wreath arrived. I'm planning on getting the inside of the house done this weekend. I'm going to need some help hoisting the tree boxes upstairs. 

It's also time to wrap up our yearlong project with a big red bow. But first there's some more to do on it. It's going to be a lengthy post so grab a cup of coffee and let's get started. Make sure you head on over to Quiltdoodledesigns.com and download the pattern. It's free the month of December. Gather your fabrics, try to work from your scraps from the previous blocks if you can. I have also added a few fabrics from my fabric stash. Those of you who got the kits may want to do this also. 


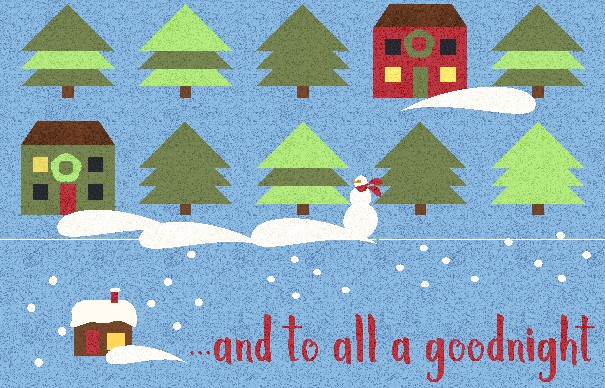
Grab your .... and to all a goodnight section and applique the cozy cottage on it. Trace out one set of the snow-covered cabin shapes onto the paper side of the fusible interfacing. Group shapes that share the same color fabric. Press onto the wrong side of the fabric. Cut out the shapes, peel off the paper backing and place the shapes fusible side down on the right side of the blue background strip, centering the design onto the ... and to all a goodnight panel. Press shapes in place following the fusible manufacturer's directions. Stitch around the raw edges of the applique using either a straight stitch or buttonhole stitch. If you're unsure of your stitch size, practice on some scrap material until you find the setting that you want to use for the machine applique. The snow can be made using white buttons or small yo-yo's. These will be attached after the quilt is quilted.


Sew the small 7" x 7" tree and gold house blocks together to make a long strip as pictured above. Press. Strip will measure 7" x 52 1/2". Applique the moose and jumping dog onto the strip as pictured below.

From blue fabric cut:
    6- 2 1/2" x WOF strips   WOF=width of fabric

Sew 2 of the strips together end to end, press. Then cut 1 - 2 1/2" x 52 1/2" strip

From the remaining blue strips cut:
    12 - 2 1/2" x 8 1/2" strips



Sew the large 8 1/2" x 8 1/2" tree and green house blocks together with a 2 1/2" x 8 1/2" sashing rectangle in between each block and on each end as shown above. Press. Strip will measure 8 1/2" x 52 1/2".


Sew the large 8 1/2 x 8 1/2" tree and red house blocks together with a 2 1/2" x 8 1/2" sashing rectangle in between each block and on each end as shown above. Press. Strip will measure 8 1/2" x 52 1/2"


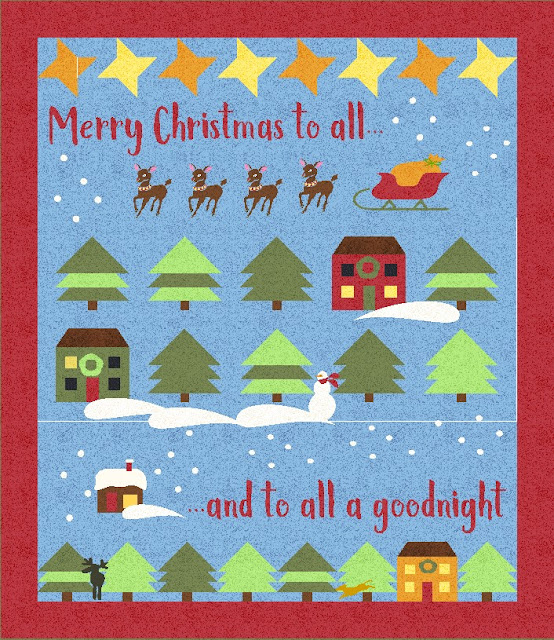
Then sew the house sections together with the 2 1/2" x 52 1/2" strip in between and then sew this section to the .... and to all a goodnight section as shown above. This is then a great time to do some more embellishment if you want to. Add the snowman and snowdrift applique pieces as shown. Remember the falling snow won't be added until the quilting is complete. 


Then sew the stars strip and the Merry Christmas to all section together, press and then add it to the top of the house section. Press again. Then it's time to add a cheery red border and layer your quilt with batting and backing and quilt as desired.

When you are completed with the quilting then it's time to embellish your quilt with snowflakes using either buttons or white fabric yo-yo's. Embroider a face onto your snowman, eyes and jingle bells to your reindeer and Santa's eyes. Have fun embellishing! Those added touches add to the quilt.

I'm still quilting my Santa's Journey quilt and I'll do a big reveal in a week or two. I'm planning on using my quilt as a wall hanging to adorn my dining room. It'll be so much fun to put on display.

Finished measurements of the 2023 BOM quilt will be 60" x 70"

 Each month's pattern is a free PDF instant download. If you miss a month, the patterns are available for $2.50 on my website and also in my Etsy shop.  


If you don't have a printer, you can purchase a PRINTED copy of the monthly patterns.

 There's also a Facebook Group, please join and post your progress! It's also fun to see everyone else progress too! Make sure to post your blocks so far! I've had to change postings to be approved since I'm getting lots of spam posted on the Facebook page. 

I have also been posting time lapse videos on my Instagram feed on how to stitch the blocks together. @quiltdoodledesigns. I hope that you all have a wonderful day and find some time to do some stitching! I'm looking forward to seeing your quilt too! Remember to post pictures and tag me! 

There will also be a new BOM starting January 1st.... stayed tuned for the details.

Happy quilting,
Cindy and Josephine


Tuesday, October 31, 2023

November's Block Santa's Journey BOM


Happy November last night was a lot of fun. I love Halloween! It was fun to see all of the trick or treaters out and about even though it was a cold evening with remnants of our overnight snowfall. Yes, we woke up to snow yesterday morning! I made my traditional mummy meatloaf and a Jack Skellington pumpkin pie for my family. It was pretty good.  Now onto this month's section of the quilt. I decided to split up this month's planned sewing into two. So, the final applique sections will be out December 1st. There is a section that can be pre-sewn together and I will go over that in this blog posting for those of you who want to get a head start on sewing. This month we will be doing a Santa and his reindeer applique onto the Merry Christmas to all... panel. 

Make sure you head on over to Quiltdoodledesigns.com and download the pattern. It's free the month of November. Gather your fabrics, try to work from your scraps from the previous blocks if you can. I have also added a few fabrics from my fabric stash. Those of you who got the kits may want to do this also. 

After you print up the applique pattern, trace the shapes to the paper side of your fusible web.

Following the manufacture instructions, iron onto the back side of the fabric grouping shapes that will use the same color fabric. Then cut all the shapes out.

You will lay these shapes out onto the Merry Christmas to all fabric panel. (Here's a big sneak peek at what the finished quilt will look like. 

Peel the paper backing off your shapes and lay them out onto the 'Merry Christmas to all...' panel. Some of the shapes will overlap. 

Following the pattern directions position the four reindeer onto the panel. Once you are happy with the placement of the design, iron in place.

The finished design will be embellished with fabric yo-yo snowflakes and buttons. I advise that you wait until your quilt is quilted before you add the 3-dimensional embellishments. you can stitch around the edges of the design with a buttonhole or satin stitch if you want. I recommend doing this if you plan on using this quilt.

When your quilt is quilted, the reindeer can be embellished with embroidery or buttons to add extra details. I'm planning on using buttons on my quilt.

If you'd like to sew ahead, piece the small trees and small gold house together as pictures. Sew the blocks together using a 1/4" seam. Iron.


Finished measurements of the 2023 BOM quilt will be 60" x 70"

 Each month's pattern is a free PDF instant download. If you miss a month, the patterns are available for $2.50 on my website and also in my Etsy shop.  


If you don't have a printer, you can purchase a PRINTED copy of the monthly patterns.

 There's also a Facebook Group, please join and post your progress! It's also fun to see everyone else progress too! Make sure to post your blocks so far! 

I have also been posting time lapse videos on my Instagram feed on how to stitch the blocks together. @quiltdoodledesigns. I hope that you all have a wonderful day and find some time to do some stitching! Next month we will finish up the applique onto our quilt blocks and also assemble our quilt.

Happy quilting,
Cindy and Josephine
The Jack Skellington pumpkin pie I made for Halloween.


Wednesday, October 4, 2023

Santa's Journey, October's Block! Finally!


I rarely am late with the BOM posting but life happens, and I did not plan well for it. I spent last weekend at my first quilt show since Covid as a vender. My plan was getting home Sunday night and do the October posting.  Well, I got home from the show exhausted and passed out in my comfy chair. You know the comfy chair... it sort of sucked me in. Add the weight of a basset hound on your lap and it was all over. Then to add to the delay, baby girl was sick and couldn't go to daycare. Family comes first in my book, so I spent a couple of days with my favorite little girl in the world. We read books, watched Bluey and had spaghetti for lunch. All of her favorite things, grandmas too. So I'm back and playing catch up... 
Now let's talk about this month's blocks. It's the last of the trees! yeah! They are done the same as last month, same size. We'll be working on a set of 4 light green trees.  These tree blocks measure 7" x 7", this includes the seam allowance. We'll be doing a few more tree blocks and then we will move onto some fun appliques and embellishments over the next couple of months.
Make sure you head on over to Quiltdoodledesigns.com and download the pattern. It's free the month of October. Gather your fabrics, try to work from your scraps from the previous blocks if you can and cut all your shapes out for the blocks. You will make 1 dark green tree block and 2 Multi dark green tree blocks. The blocks will measure 7" x 7", this includes the seam allowance.

·        Following the pattern, pair together blue B square with green F rectangle, right sides together. Sew corner to corner diagonally. Trim to a ¼” seam on one side to form a triangle on the left side of the ‘tree’.

·         Press to the dark side.

·         Pair together the blue B square on the other side of the green F rectangle, right sides together. Sew corner to corner diagonally to form the right side of the ‘tree’. Make 2 FBF rectangles for each tree.

·         Press to the dark side.

·         Sew together a CDC strip, press to the dark side.

·         Sew one A triangle with the E triangle right sides together along the diagonal edge. Repeat on the other side to form an AEA triangle rectangle for the top of the tree.

·         Following the block layout, lay out all pieced rectangle sections to form the tree block.

·         Press.


Following the block layout, lay out all of the pieces of the tree block. Follow the layout picture, stitch the block together using a scant 1/4" seam. Sew the 'rows' together using a 1/4" seam. Iron. Block should measure 8 1/2" x 8 1/2". You will make two dark green multi green blocks, and 2 light green multi green tree blocks.


~ Dark Green Small Tree ~
(make 1)

~ Multi Dark Small Tree ~
(make 2 blocks)
 
Finished measurements of the 2023 BOM quilt is 60" x 70"

Grab the button and link it to the Quilt Doodle Blog and help spread the word! 

 Each month's pattern is a free PDF instant download. If you miss a month, the patterns are available for $2.50 on my website and also in my Etsy shop.  


If you don't have a printer, you can purchase a PRINTED copy of the monthly patterns.

 There's also a Facebook Group, please join and post your progress! It's also fun to see everyone else progress too! Make sure to post your blocks so far! 

I have also been posting time lapse videos on my Instagram feed on how to stitch the blocks together. @quiltdoodledesigns. I hope that you all have a wonderful day and find some time to do some stitching! Next month we will do some special applique onto our quilt blocks. It's time to cute it up for the holidays!

Happy quilting,
Cindy and Josephine


Friday, September 1, 2023

September Little Tree Block 2023


Summer is officially over, and it went by way too fast! Hubby and I ended our summer with a trip to the Minnesota State Fair. Our extended Labor Day weekend will be spent being weekend warriors with projects around the house. We have one more family vacation planned up north to go fishing and enjoy the quiet. Planning on playing some cards, do a little fishing, and enjoy lots of laughs with the kids. 
Now let's talk about this month's blocks. We'll be working on a set of 4 light green trees.  These tree blocks measure 7" x 7", this includes the seam allowance. We'll be doing a few more tree blocks and then we will move onto some fun appliques and embellishments over the next couple of months.
Make sure to download a copy of the pattern for September and gather your fabric.


NOTE: From the green fabric you will cut a larger block and then cut it in half diagonally twice, to form 4 triangles.
(label E) 


·        Following the pattern, pair together blue B square with green F rectangle, right sides together. Sew corner to corner diagonally. Trim to a ¼” seam on one side to form a triangle on the left side of the ‘tree’.

·         Press to the dark side.

·         Pair together the blue B square on the other side of the green F rectangle, right sides together. Sew corner to corner diagonally to form the right side of the ‘tree’. Make 2 FBF rectangles for each tree.

·         Press to the dark side.

·         Sew together a CDC strip, press to the dark side.

·         Sew one A triangle with the E triangle right sides together along the diagonal edge. Repeat on the other side to form an AEA triangle rectangle for the top of the tree.

·         Following the block layout, lay out all pieced rectangle sections to form the tree block.

·         Press.


Following the block layout, lay out all of the pieces of the tree block. Follow the layout picture, stitch the block together using a scant 1/4" seam. Sew the 'rows' together using a 1/4" seam. Iron. Block should measure 8 1/2" x 8 1/2". You will make two dark green multi green blocks, and 2 light green multi green tree blocks.

~Small Green Tree Block~

 Help spread the word and tell all your quilting friends about this fun wintery block of the month! Each month we will work on a new section of this mystery quilt. There's basic piecing, some applique and other fun embellishments. As always, the monthly directions will be free during that month and then available for a small fee after that.
Finished measurements of the 2023 BOM quilt is 60" x 70"

Grab the button and link it to the Quilt Doodle Blog and help spread the word! 

I will be doing two versions of this quilt as we sew along. The blue version and then a white one. It will be the same pattern just a different background. Make sure to download the PDF directions on the website. Grab your fabric and start sewing!

 Each month's pattern is a free PDF instant download. If you miss a month, the patterns are available for $2.50 on my website and also in my Etsy shop.  


If you don't have a printer, you can purchase a PRINTED copy of the monthly patterns.

 There's also a Facebook Group, please join and post your progress! It's also fun to see everyone else progress too! Make sure to post your blocks so far! 

I have also been posting time lapse videos on my Instagram feed on how to stitch the blocks together. @quiltdoodledesigns. I hope that you all have a wonderful day and find some time to do some stitching! Wishing you a wonderful Labor Day weekend.

Happy quilting,
Cindy and Josephine


Tuesday, August 1, 2023

August's Block, Gold House


Happy August! Summer is flying by! We just got back from our family vacation spent at the lake and it seems as soon as we are back, we are already thinking about end of summer. It used to mark back to school events but now that the boys are all grown up, it's more summer is almost over. It was nice to come home and be greeted by a small harvest of cherry tomatoes and a zucchini. I'm looking forward to canning tomatoes so I'm hoping for a bumper crop! I made my first batch of cowboy candy, and my boys are happy. What is cowboy candy? It's pickled jalapenos. Super spicey! My guys like it on egg sandwiches.

This month's block is a gold house. One block! Summer is busy with fun family activities, back to school events, so I thought one block would be easy to do. 
Download the PDF pattern and print it up. Following the cutting directions, cut all of the pieces for the house block. I used 'leftover' pieces of fabric from what I've cut so far to cut out these shapes.

I find it helpful to lay out the block pieces next to my sewing machine. It helps me construct the block correctly. The pattern has a block layout page to help you construct the house block.

After the block is constructed, square it up to measure 7" x 7". 

Trace the wreath shape onto the paper side of your fusible web for iron on applique. Following the manufacturer's instructions, iron onto the back of the green fabric. I like using my applique scissors to cut the shape out. Then peel off paper and iron onto the house block centering it between the upper windows.

~ Gold House Block ~


The gold house block measures 7" x 7", smaller than the other house blocks that you have made. 
 Help spread the word and tell all your quilting friends about this fun wintery block of the month! Each month we will work on a new section of this mystery quilt. There's basic piecing, some applique and other fun embellishments. As always, the monthly directions will be free during that month and then available for a small fee after that.
Finished measurements of the 2023 BOM quilt is 60" x 70"

Grab the button and link it to the Quilt Doodle Blog and help spread the word! 

I will be doing two versions of this quilt as we sew along. The blue version and then a white one. It will be the same pattern just a different background. Make sure to download the PDF directions on the website. Grab your fabric and start sewing!

 Each month's pattern is a free PDF instant download. If you miss a month, the patterns are available for $2.50 on my website and also in my Etsy shop.  


If you don't have a printer, you can purchase a PRINTED copy of the monthly patterns.

 There's also a Facebook Group, please join and post your progress! It's also fun to see everyone else progress too! Make sure to post your blocks so far! 

I have also been posting time lapse videos on my Instagram feed on how to stitch the blocks together. @quiltdoodledesigns. I hope that you all have a wonderful day and find some time to do some stitching! Wishing you a wonderful day, if you follow me on Instagram, you will see I'm on a special trip to NYC to visit Marcus Fabrics/Timeless Treasures. Looking forward to showing you some fun stuff!

Happy quilting,
Cindy and Josephine


Saturday, July 1, 2023

July's Block Santa's Journey BOM


Happy July! Summer has arrived and its vacation season! So, this month's block will look very familiar to April's block. You will be making four Multi green tree blocks. I thought with the arrival of summer it would be nice to have an easy block to work on this month that would go together quickly. It's going to be a busy weekend; baby girl is getting baptized. I'm looking forward to some family time. We have no big plans for the 4th of July. I'll probably do a little grilling and watch fireworks on TV. Big perk, no mosquitoes! I'll be consoling dogs while the neighborhood kids shoot off fireworks that night. Our dogs go crazy and run from window to window barking away.

This month's block is a multi-green tree. We will make 4 total, alternating the light and dark greens. There will be optional embellishments offered towards the end of the year, you'll want to quilt your quilt first before decorating your trees. 
Make sure to download a copy of the pattern for February and gather your fabric.


NOTE: From the green fabric you will cut a larger block and then cut it in half diagonally twice, to form 4
(label E) You may have E triangles left over from when you did April's trees.

Following the pattern, cut all of your pieces out as shown.

NOTE: Sew a 2" blue square to the rectangle green strip right sides together on the diagonal as shown. 


Following the block layout, lay out all of the pieces of the tree block. Follow the layout picture, stitch the block together using a scant 1/4" seam. Sew the 'rows' together using a 1/4" seam. Iron. Block should measure 8 1/2" x 8 1/2". You will make two dark green multi green blocks, and 2 light green multi green tree blocks.

  ~ Large Multi Green Tree Block Make 2 of each color combo~ 


 Help spread the word and tell all your quilting friends about this fun wintery block of the month! Each month we will work on a new section of this mystery quilt. There's basic piecing, some applique and other fun embellishments. As always, the monthly directions will be free during that month and then available for a small fee after that.
Finished measurements of the 2023 BOM quilt is 60" x 70"

Grab the button and link it to the Quilt Doodle Blog and help spread the word! 

I will be doing two versions of this quilt as we sew along. The blue version and then a white one. It will be the same pattern just a different background. Make sure to download the PDF directions on the website. Grab your fabric and start sewing!

 Each month's pattern is a free PDF instant download. If you miss a month, the patterns are available for $2.50 on my website and also in my Etsy shop.  


If you don't have a printer, you can purchase a PRINTED copy of the monthly patterns.

 There's also a Facebook Group, please join and post your progress! It's also fun to see everyone else progress too! Make sure to post your blocks so far! 

I have also been posting time lapse videos on my Instagram feed on how to stitch the blocks together. @quiltdoodledesigns. I hope that you all have a wonderful day and find some time to do some stitching! Wishing you a wonderful 4th of July and hope that have a wonderful weekend.

Happy quilting,
Cindy and Josephine