
 |
| This week we will work on the birdhouse and bluebird blocks. |
 |
| ~ Bluebird Block ~ |
 |
It is very helpful to lay out all the block pieces on a
board next to your sewing machine. Use the block layout diagrams to lay all the
pieces out. Seams are scant ¼” seams. I use a quarter inch foot on my sewing machine and press the seams to the dark side. Square up blocks to measure 2” x 2”
squares. Start by sewing the C-C sections together. Press. Then sew
the C-C triangle to an A triangle. Press. Sew the A-A triangles together. Press. Then construct the block following the diagrams included in the pattern. |

 |
| ~ Birdhouse Block ~ |
The birdhouse block is pretty quick and easy to do. After the bluebird block it's a nice break! You will make three blocks using different fabrics. Following the pattern directions, cut all your pieces out for all three blocks.
 |
| Block Layout |
![]() Draw a diagonal line on the wrong side of the A
and B squares corner to corner.
Draw a diagonal line on the wrong side of the A
and B squares corner to corner.
 |
| Diagram 1 |
![]() Place Square A on top of the rectangle D, right
sides together. Stitch just a hair to the outside of this line. (Diagram 1)
Trim excess fabric to ¼” seam and press. Press the seam to face to the outside
of the unit.
Place Square A on top of the rectangle D, right
sides together. Stitch just a hair to the outside of this line. (Diagram 1)
Trim excess fabric to ¼” seam and press. Press the seam to face to the outside
of the unit.
 |
| Diagram 2 |
![]() Place square B on top of the opposite side,
right sides together. Make sure the diagonal line is going in the right
direction. Stitch just a hair to the outside of the line. (Diagram 2) Trim
excess fabric to ¼” seam and press.
Place square B on top of the opposite side,
right sides together. Make sure the diagonal line is going in the right
direction. Stitch just a hair to the outside of the line. (Diagram 2) Trim
excess fabric to ¼” seam and press.
 |
| Flying Gee |
![]() Make 1 flying geese unit using the green, lt
green and brown fabric for a total of 3 flying geese units. This will be the
roof to your birdhouse.
Make 1 flying geese unit using the green, lt
green and brown fabric for a total of 3 flying geese units. This will be the
roof to your birdhouse.
![]() Following the instructions provided by the fusible web
manufacturer, trace 3 of the birdhouse circles onto the paper side of the
fusible web. Iron circles onto the back side of brown fabric. Iron the circle
center onto the wrong side of the brown fabric.
Cut the pieces out. Follow the pattern layout for placement. Center the circle
onto the 8” x 8” fabric D square. Iron in place. Using a blanket, zig zag or
satin stitch on your sewing machine; sew along the edges of all the pieces.
Practice on some scrap material if you are new to machine applique. Finished
block measures 8” x 8” (includes seam allowance).
Following the instructions provided by the fusible web
manufacturer, trace 3 of the birdhouse circles onto the paper side of the
fusible web. Iron circles onto the back side of brown fabric. Iron the circle
center onto the wrong side of the brown fabric.
Cut the pieces out. Follow the pattern layout for placement. Center the circle
onto the 8” x 8” fabric D square. Iron in place. Using a blanket, zig zag or
satin stitch on your sewing machine; sew along the edges of all the pieces.
Practice on some scrap material if you are new to machine applique. Finished
block measures 8” x 8” (includes seam allowance).
Sew the Lt Green roof to the striped D birdhouse square,
right sides together. Press. ![]() Sew the Brown
roof to the lt green D birdhouse square, right sides together. Press.
Sew the Brown
roof to the lt green D birdhouse square, right sides together. Press. ![]() Sew the Green
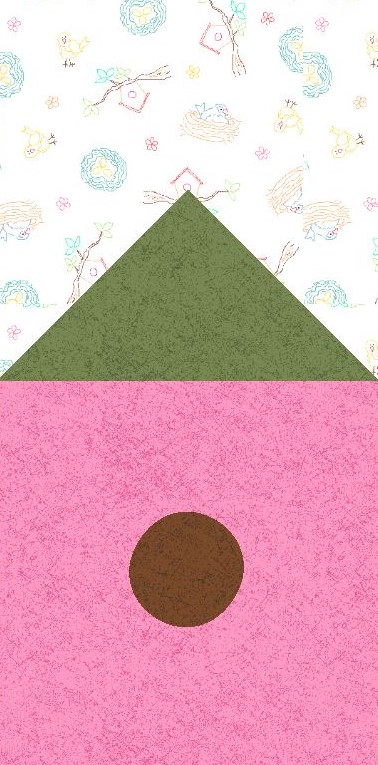
roof to the pink D birdhouse square, right sides together. Press.
Sew the Green
roof to the pink D birdhouse square, right sides together. Press. ![]() Sew a 4 ¼” x 8” background
rectangle to the top of each birdhouse block, right sides together. Press.
Finished unit measures 8” x 15”, seam allowance is included.
Sew a 4 ¼” x 8” background
rectangle to the top of each birdhouse block, right sides together. Press.
Finished unit measures 8” x 15”, seam allowance is included.
 |
| ~ Birdhouse Block ~ |
I'll see you next Saturday. We will be adding borders and assembling our quilt top.
No comments:
Post a Comment